Introduction TO THE Windows Kernel Development USES Rust (PaRT 1)
Introduction
Greetings, fearless reader! Brace yourself for an exhilarating journey into the realm of driver development, empowered by the formidable Rust programming language!
As you embark on this thrilling adventure, anticipate a forthcoming expedition where we shall craft a potent driver capable of rendering processes unseen. Skipping this article would be a missed opportunity, as it holds the answers to the questions posed here.
If Rust is uncharted territory for you, worry not, for I shall serve as your guide, even venturing into the familiar realms of C++. All that`s required is a bit of free time, proficiency in C++ programming, and a basic understanding of kernel-level sorcery.
But why Rust, you may wonder? The answer is evident: Rust fuses style, innovation, and unwavering might. It delivers performance akin to C++, fortified by impervious safety measures. Tech titans like Microsoft, Google, Mozilla, and the Linux Foundation have recognized its potential. Even Linus Torvalds, the advocate of "C forever," officially endorsed Rust`s integration into the Linux kernel [1]. Microsoft is rewriting the core of Windows with Rust [2], yet they have yet to provide developers the privilege of wielding Rust within the Windows kernel. No matter; we shall seize the reins ourselves, surpassing their efforts.
In 2015, the first version of the language was released, and since then it has been updated every 6 weeks. It has 3 releases channels: stable, beta, and nightly. (By the way, we will need the nightly toolchain to develop drivers). In addition, Rust has editions (something like standards in C++), namely Rust 2015, Rust 2018, and now at the time of writing - Rust 2021. That`s why Rust even has the cargo fix --edition command, which helps to partially fix incompatible places for the new standard.
Dependencies
So set the stage for our quest, we must gather the necessary tools and prepare our environment for the challenges that lie ahead. Here`s a checklist of what we need:
Required Tools
1. Install Rust: First and foremost, let`s embrace the power of Rust by installing it from here.
2. Install SDK: We need the Windows SDK for our expedition. You can acquire it here.
3. Install WDK: The Windows Driver Kit (WDK) is our trusted companion for driver development. You can obtain it here.
4. Install Sysinternals: The Sysinternals Suite will be our invaluable toolkit. Grab it here.
NOTE: The terminal should be run with administrator privileges.
Development
Configuration
After creating the project, navigate to the hello-win-kernel directory. You`ll find the following structure:
cargo new hello-win-kernel --lib
After creating the project, navigate to the hello-win-kernel directory. You`ll find the following structure:
# hello-win-kernel folder
srclib.rs
.gitignore
Cargo.toml
In Rust, we typically name the file containing the entry point for applications as main.rs, while for libraries, it`s lib.rs. The Cargo.toml file holds project dependencies and settings, while .gitignore wisely excludes the target directory, where binaries are stored.
Now, let`s enhance our project setup by editing the Cargo.toml file. First, add a [lib] section, specifying the entry point file`s path and designating it as a "dynamic library."
[package]
name = "hello-win-kernel"
version = "0.1.0"
edition = "2021"

[lib]
path = "src/lib.rs"
crate-type = ["cdylib"]
We`ll also create [profile.dev] and [profile.release] sections to set the panic type as "abort" for better error handling.
Next, include a [build-dependencies] section, introducing the winreg crate for Windows registry operations:
[profile.dev]
panic = "abort"

[profile.release]
panic = "abort"

[build-dependencies]
winreg = "0.50.0"
To ensure smooth project compilation, create a rust-toolchain file in the hello-win-kernel directory, specifying the use of the nightly toolchain, enabling access to special flags:
rust-toolchain
nightly
To compile the driver, you`ll need to add paths to the WDK. This can be achieved using a build.rs script. The build.rs script is executed by cargo before building the package. It allows you to locate installed libraries and include their information in Cargo. After using the #[link(name = "libname")] construct in your code, the build process will search the added paths and link libraries, similar to C or C++. Create a build.rs file in the hello-win-kernel directory. Populate this file with the code to fetch the WDK. You can base your script on the one found at this GitHub repository.
build.rs
// A.k.a #include  in the C++
extern crate winreg;

// Imports the need features. A.k.a using namespace std in the C++
use std::env::var;
use std::error::Error;
use std::fmt;
use std::path::{Path, PathBuf};
use winreg::enums::*;
use winreg::RegKey;

// Windows Kits registry key
const WIN_KITS_KEY: &str = r"SOFTWAREMicrosoftWindows KitsInstalled Roots";

// Custom error type
#[derive(Debug)]
struct BuildError {
    msg: String,
}

impl Error for BuildError {}

impl fmt::Display for BuildError {
    fn fmt(&self, f: &mut fmt::Formatter) -> fmt::Result {
        write!(f, "BuildError: {}", self.msg)
    }
}

// Get the Windows Kits directory from the registry
fn get_windows_kits_dir() -> Result {
    let hklm = RegKey::predef(HKEY_LOCAL_MACHINE);
    match hklm.open_subkey(WIN_KITS_KEY) {
        Ok(key) => match key.get_value::("KitsRoot10") {
            Ok(dir) => Ok(dir.into()),
            Err(_) => Err(BuildError {
                msg: format!("Can not get value: {}", WIN_KITS_KEY),
            }),
        },
        Err(_) => Err(BuildError {
            msg: format!("Can not open sub_key: {}", WIN_KITS_KEY),
        }),
    }
}

// Get the latest km directory from the Windows Kits directory
fn get_km_dir(windows_kits_dir: &PathBuf) -> Result {
    match Path::new(windows_kits_dir).join("lib").read_dir() {
        Ok(read_dir) => {
            match read_dir
                .filter_map(|dir| dir.ok())
                .map(|dir| dir.path())
                .filter(|dir| {
                    dir.components()
                        .last()
                        .and_then(|c| c.as_os_str().to_str())
                        .map(|c| c.starts_with("10.") && dir.join("km").is_dir())
                        .unwrap_or(false)
                })
                .max()
                .ok_or_else(|| format!("Can not find a valid km dir in `{:?}`", windows_kits_dir))
            {
                Ok(max_lib_dir) => Ok(max_lib_dir.join("km")),
                Err(msg) => Err(BuildError { msg }),
            }
        }
        Err(_) => Err(BuildError {
            msg: format!("Can not read dir: {:?}", windows_kits_dir),
        }),
    }
}

fn main() {
    let windows_kits_dir = get_windows_kits_dir().unwrap();
    let km_dir = get_km_dir(&windows_kits_dir).unwrap();
    let target = var("TARGET").unwrap();
    let arch = if target.contains("x86_64") {
        "x64"
    } else if target.contains("i686") {
        "x86"
    } else {
        panic!("Only support x64 and x86!");
    };
    let wdk_lib_dir = km_dir.join(arch);

    // link
    println!(
        "cargo:rustc-link-search=native={}",
        wdk_lib_dir.to_str().unwrap()
    );
}
To usher forth our driver, we must first craft a configuration file. Fear not, for I shall guide you through this path to triumph.
1. Create a directory named .cargo in your current domain—a realm of possibilities.
2. Within this newfound domain, engrave a file named config. Herein, we shall etch our directives.
Inscribe these flags within the config file, each a beacon guiding us through the labyrinthine depths of driver compilation. For a deeper understanding of these flags, you may delve into the annals of wisdom found at MSDN [5].
.cargo/config
[build]
target = "x86_64-pc-windows-msvc"

rustflags = [
    # Pre Link Args
    "-Z", "pre-link-arg=/NOLOGO",
    "-Z", "pre-link-arg=/NXCOMPAT",
    "-Z", "pre-link-arg=/NODEFAULTLIB",
    "-Z", "pre-link-arg=/SUBSYSTEM:NATIVE",
    "-Z", "pre-link-arg=/DRIVER",
    "-Z", "pre-link-arg=/DYNAMICBASE",
    "-Z", "pre-link-arg=/INCREMENTAL:NO",
    "-Z", "pre-link-arg=/MANIFEST:NO",
    "-Z", "pre-link-arg=/PDBALTPATH:none",

    # Post Link Args
    "-C", "link-arg=/OPT:REF,ICF",
    "-C", "link-arg=/ENTRY:driver_entry",
    "-C", "link-arg=/MERGE:.edata=.rdata",
    "-C", "link-arg=/MERGE:.rustc=.data",
    "-C", "link-arg=/INTEGRITYCHECK"
]
Implementation
Phew! Hooray, we`ve done it! Can you believe it? It`s time to start coding. Yes, we can dive into developing the driver. Just like C++, Rust doesn`t support the standard library in kernel mode due to the differences between user-mode and kernel-mode. Therefore, we need to disable it using the #![no_std] attribute, which should be specified at the beginning of the lib.rs file.
Next, we must declare the __CxxFrameHandler3 function and the _fltused variable to resolve linkage errors. Additionally, we need to implement our custom panic_handler since the standard library is no longer available, as we`ve disabled it.
Moving forward, let`s create the driver_entry function, which will be the entry point for the driver. You can name this function differently, but you need to specify it in the .cargo/config file by changing the field "-C", "link-arg=/ENTRY:driver_entry", for example, to "-C", "link-arg=/ENTRY:entry".
Since the Windows API is implemented in C, we need to use FFI (Foreign Function Interface). In simple terms, it`s a mechanism that allows us to call APIs from another language.
To start, we need to disable name mangling using the #[no_mangle] attribute and specify that the system (stdcall) calling convention is used for function calls with extern "system". For convenience, let`s create some types. Instead of PDRIVER_OBJECT and PUNICODE_STRING, we`ll use PVOID for now, as we don`t need those data structures at the moment.
So, let`s add the following code to src/lib.rs.
src/lib.rs
// Disables the standard library
#![no_std]

// A.k.a #include  in C++
mod dbg;
mod ntstatus;
mod types;

// Imports the need features. A.k.a using namespace std in the C++
use dbg::*;
use ntstatus::*;
use types::*;

// Need for fix linker error.
#[no_mangle]
pub extern "system" fn __CxxFrameHandler3(_: *mut u8, _: *mut u8, _: *mut u8, _: *mut u8) -> i32 {
    unimplemented!()
}

// Need for fix linker error. Floating point calculations aren`t allowed when running in the Windows Kernel.
#[export_name = "_fltused"]
static _FLTUSED: i32 = 0;

// Panic hanlder
#[cfg(not(test))]
#[panic_handler]
fn panic(_info: &core::panic::PanicInfo) -> ! {
    // The purpose of the loop construct in this context is to create an infinite loop.
    // When a panic occurs, the panic function is invoked, and instead of unwinding
    // the stack or aborting the program, it enters an infinite loop.
    // This behavior is intentional to prevent the program from terminating or propagating
    // the panic further. By using an infinite loop in the panic handler, the program effectively
    // hangs or stalls at the point of panic, allowing for potential diagnostics or
    // debugging to be performed.
    loop {}
}

// The entry point of the driver, set as global (pub).
#[no_mangle]
pub extern "system" fn driver_entry(_driver: PVOID, _path: PVOID) -> NTSTATUS {
    kd_print!("Hello, world!
");
    STATUS_SUCCESS
}
Next, we`ll create src/types.rs and add C-like types using aliases (a.k.a typedef in C). Additionally, in the src/ntstatus.rs file, we`ll add statuses such as STATUS_SUCCESS.
src/types.rs
// Aliases for Windows types
pub type NTSTATUS = u32;
pub type PCSTR = *const u8;
pub type PVOID = *mut core::ffi::c_void;
src/ntstatus.rs
// Imports the need features. A.k.a using namespace std in the C++
use crate::types::*;

pub const STATUS_SUCCESS: NTSTATUS = 0x00000000;
Great, now let`s add the DbgPrint API, which is used for logging debug information when developing drivers. To do this, we`ll create a file called src/dbg.rs, link to ntoskrnl, and add the DbgPrint API. Additionally, for more convenient work, we`ll create a kd_print macro since we need to constantly add the \O character at the end of a sentence due to the specific programming in C (In C, strings are terminated with a \O character).
We`ll wrap DbgPrint in an unsafe block because it`s an API from another language, and Rust cannot provide its guarantees for it.
src/dbg.rs
// Imports the need features. A.k.a using namespace std in the C++
use crate::types::*;

// Imports the `DbgPrint` function from `ntoskrnl.exe`, and set as a global function (pub),
// that can be called from anywhere module in the crate.
#[link(name = "ntoskrnl")]
extern "C" {
	  #[allow(dead_code)]
    pub fn DbgPrint(format: PCSTR, ...) -> NTSTATUS;
}

// Macro that calls the `DbgPrint` function, and prepends the string with the name of the driver,
// and a null terminator. The `unsafe` is used because the `DbgPrint` function is written in a different language,
// and Rust cannot guarantee safety.
#[macro_export]
#[cfg(debug_assertions)]
macro_rules! kd_print {
    ($string: expr) => {
        unsafe {
            $crate::DbgPrint(concat!("[hello_win_kernel.sys] ", $string, "�").as_ptr())
        }
    };

    ($string: expr, $($x:tt)*) => {
        unsafe {
            $crate::DbgPrint(concat!("[hello_win_kernel.sys] ", $string, "�").as_ptr(), $($x)*)
        }
    };
}

// Empty macro for release
#[macro_export]
#[cfg(not(debug_assertions))]
macro_rules! kd_print {
	  ($string: expr) => {};
    ($string: expr, $($x:tt)*) => {};
}
Now we can successfully build our driver. However, this is not the end because next, we will need to implement the driver signing and deployment mechanism.
The example driver in C++ below demonstrates that writing a driver in C or C++ is easier compared to Rust. But until there is official support from Microsoft, which everyone is eagerly waiting for (actually, until we take matters into our own hands and implement it ourselves, as in the case with C++), we get the guarantees of Rust for our development level, allowing us to build a safer driver, along with full inline ASM, pattern matching, and many other cool features that Rust offers.
Some startups are already using Rust to develop drivers for virtual devices in the context of cybersecurity.
Example driver in C++ from the "hello-win-kernel-cpp" project:
#include

extern "C"
{
    DRIVER_INITIALIZE DriverEntry;
}


#ifdef ALLOC_PRAGMA
#pragma alloc_text(INIT, DriverEntry)
#endif

// The entry point of the driver
_Use_decl_annotations_
NTSTATUS DriverEntry([[maybe_unused]] PDRIVER_OBJECT DriverObject,
                     [[maybe_unused]] PUNICODE_STRING RegistryPath)
{
    DbgPrint("[hello-win-kernel-cpp.sys] Hello, World!
");
    return STATUS_SUCCESS;
}
Deployment and testing
To test our driver, we first need to change its extension from .dll to .sys and sign it with a test certificate. To automate all of this, we`ll use cargo-make. To do so, execute the following command in the terminal.
cargo install cargo-make
Next, we will create a middleware called WIN_SDK_TOOLS, which may be related to the Windows SDK tools. For whom do you sign the following steps:
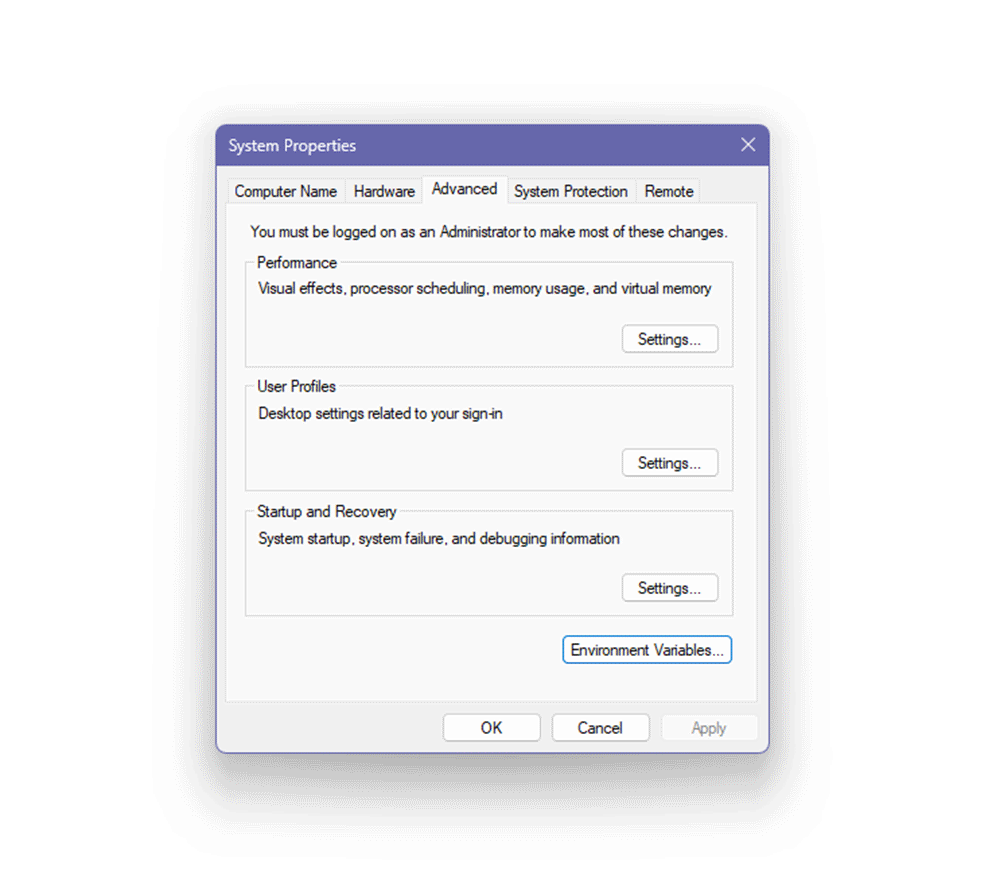
1. Open View advanced system settings by searching for and launching this option.
2. In the System Properties window, select the Advanced tab.
3. Click the Environment Variables button.
4. In the Environment Variables window, scroll down to the System variables section and click the New button.
5. In the Variable name field, enter the variable name as WIN_SDK_TOOLS.
6. In the Variable value field, provide the path to the folder containing the Windows SDK tools.
7. Click OK to save the changes.
Next, we need to create a makefile.toml in which we`ll define build rules.
Cargo-make is similar to regular make, but the rules are defined in a slightly different, simpler format. To elaborate, in this script, we create tasks for building the driver, renaming the extension to .sys, signing the driver using the makecer.exe and signtool.exe utilities, deploying the driver (moving the driver and certificate to a separate bin folder), and cleaning the build.
Makefile.toml
[env.development]
TARGET_PATH = "target/x86_64-pc-windows-msvc/debug"

[env.release]
TARGET_PATH = "target/x86_64-pc-windows-msvc/release"
BUILD_FLAGS = "--release"

[tasks.build-driver]
script = [
    "cargo build %BUILD_FLAGS%"
]

[tasks.rename-driver]
dependencies = ["build-driver"]
ignore_errors = true
script = [
    "cd %TARGET_PATH%",
    "rename hello_win_kernel.dll hello_win_kernel.sys",
]

[tasks.sign-driver]
dependencies = ["build-driver", "rename-driver"]
script = [
    ""%WIN_SDK_TOOLS%\makecert.exe" -r -pe -ss PrivateCertStore -n "CN=hello_win_kernel_cert" hello_win_kernel_cert.cer",
    ""%WIN_SDK_TOOLS%\signtool.exe" sign /fd sha256 /v /s PrivateCertStore /n "hello_win_kernel_cert" /t http://timestamp.digicert.com /a %TARGET_PATH%/hello_win_kernel.sys",
]

[tasks.deploy]
dependencies = ["sign-driver"]
script = [
    "mkdir bin",
    "move hello_win_kernel_cert.cer bin\hello_win_kernel_cert.cer",
    "move %TARGET_PATH%\hello_win_kernel.sys bin\hello_win_kernel.sys"
]

[tasks.cleanup]
script = [
    "rmdir /s /q bin",
    "cargo clean",
]
To build the project, change the extension, and sign the driver, you need to execute the following command (Do not use the built-in VSCode terminal, as there can be issues during driver signing. I recommend using Windows Terminal):
cargo make deploy
To clean the project, execute the following command:
cargo make cleanup
You can also execute individual steps separately. For example, if you need to only sign the driver, run the following command:
cargo make sign-driver
Next, you can proceed to testing. To do this, launch a virtual machine with Windows 10 x64 or Windows 11, with test mode and debugging mode enabled. If these modes are disabled, you need to execute the following commands and restart the OS:
NOTE: The terminal should be run with administrator privileges
# Enable Test mode
bcdedit -set TESTSIGNING ON

# Enable Debug kernel
bcdedit /debug on
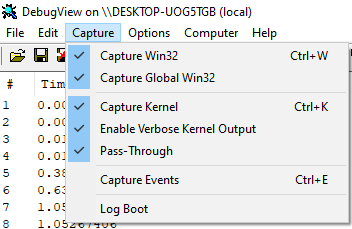
Copy the **DebugView** utility from the **sysinternals** package, which you should have downloaded from Microsoft servers, to the virtual machine. Create a test folder on the desktop and transfer your driver and certificate from the host machine to this folder.
Then, run **DebugView**, click **Capture**, and check the box next to **Capture Kernel** and Enable Verbose Kernel Output. This will allow you to see kernel debug output.
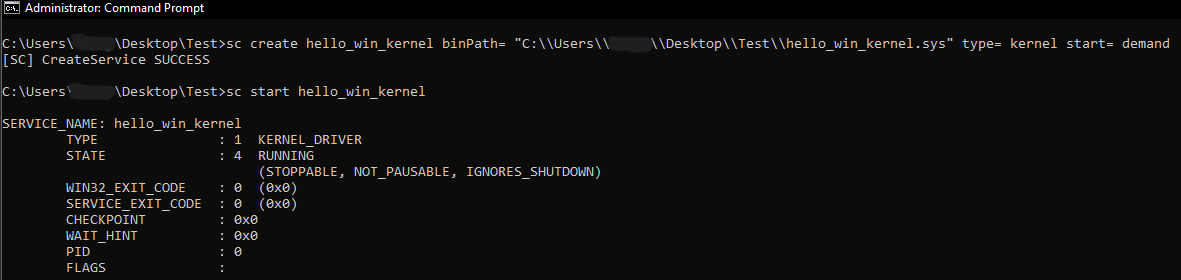
After these manipulations, you can proceed to register and start the driver by executing the following commands in the terminal:
NOTE: The terminal should be run with administrator privileges when registering and starting a driver on Windows
To register your driver:
sc create hello_win_kernel binPath= "FullPathhello_win_kernel.sys" type= kernel start= demand
Start Driver
sc start hello_win_kernel
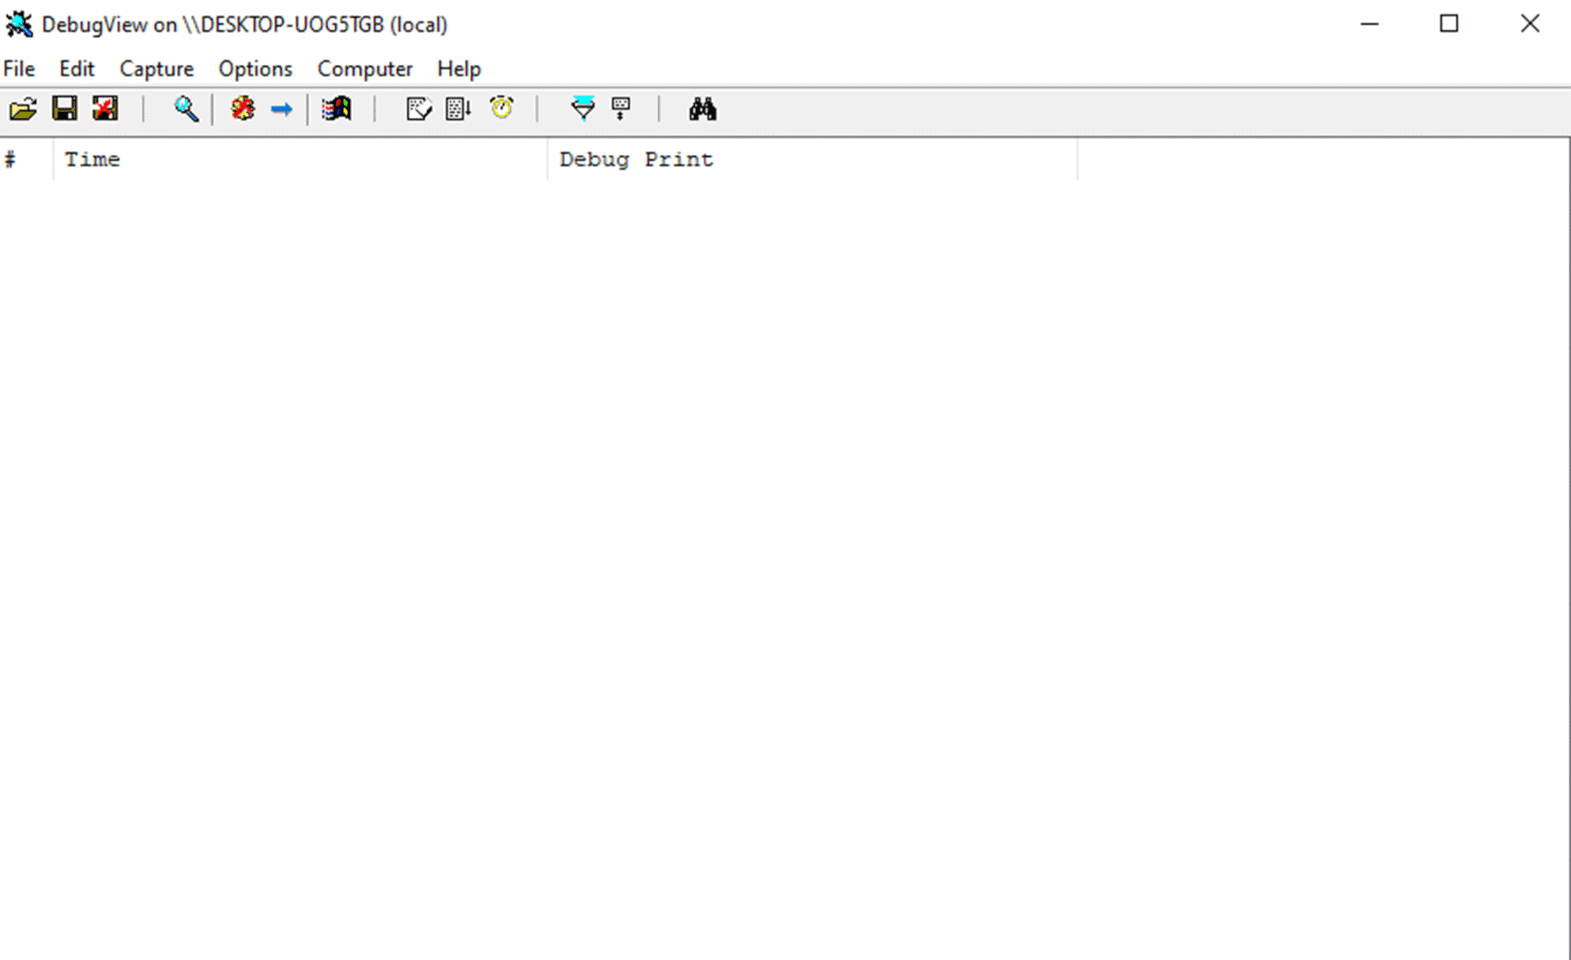
Result
Great! When you have successfully registered and started your driver, you should be able to see the "Hello, world!" message from your driver in DebugView.
Summary
That`s it! You`ve learned how to build your own driver using the Rust programming language. As you can see, it is possible to write a driver in Rust, although it requires some effort. In fact, if you set everything up correctly, the result will be very impressive. So, I`m waiting for you in the second article, where we`ll move on to writing a real driver.
If you have any more questions or need further assistance in the future, feel free to reach out. Good luck with your driver development!
Reference
1. Microsoft is busy rewriting core Windows code in memory-safe Rust
https://www.theregister.com/2023/04/27/microsoft_windows_rust/
2. Linus Torvalds: Rust will go into Linux 6.1
https://www.zdnet.com/article/linus-torvalds-rust-will-go-into-linux-6-1/
3. Build Scripts
https://doc.rust-lang.org/cargo/reference/build-scripts.html
4. Build script for driver
https://github.com/memN0ps/rootkit-rs/blob/master/driver/build.rs
5. MSVC flags
https://learn.microsoft.com/en-us/cpp/build/reference/linker-options?view=msvc-170